
Entrepreneurial Instructions
How to resell the course material?
Purchase the course bundle & extras package on our website.
You will then receive 5 links: 1 for Google Drive PLR Material Library, 1 for the Storefront, and 3 for the Sales Funnel Templates.

You will need to request access to the Google drive and we will approve your access within 12 hours. (Usually immediately - this is to prevent users from sharing the Google drive link with anyone)
Sign up for a free systeme.ioaccount here: Sign Up.
Once you have created a free account, make sure you log in and then click on the 4 website share links one by one to download the website and funnels to your account. (Or paste the share links one by one in the URL bar once you are signed in)
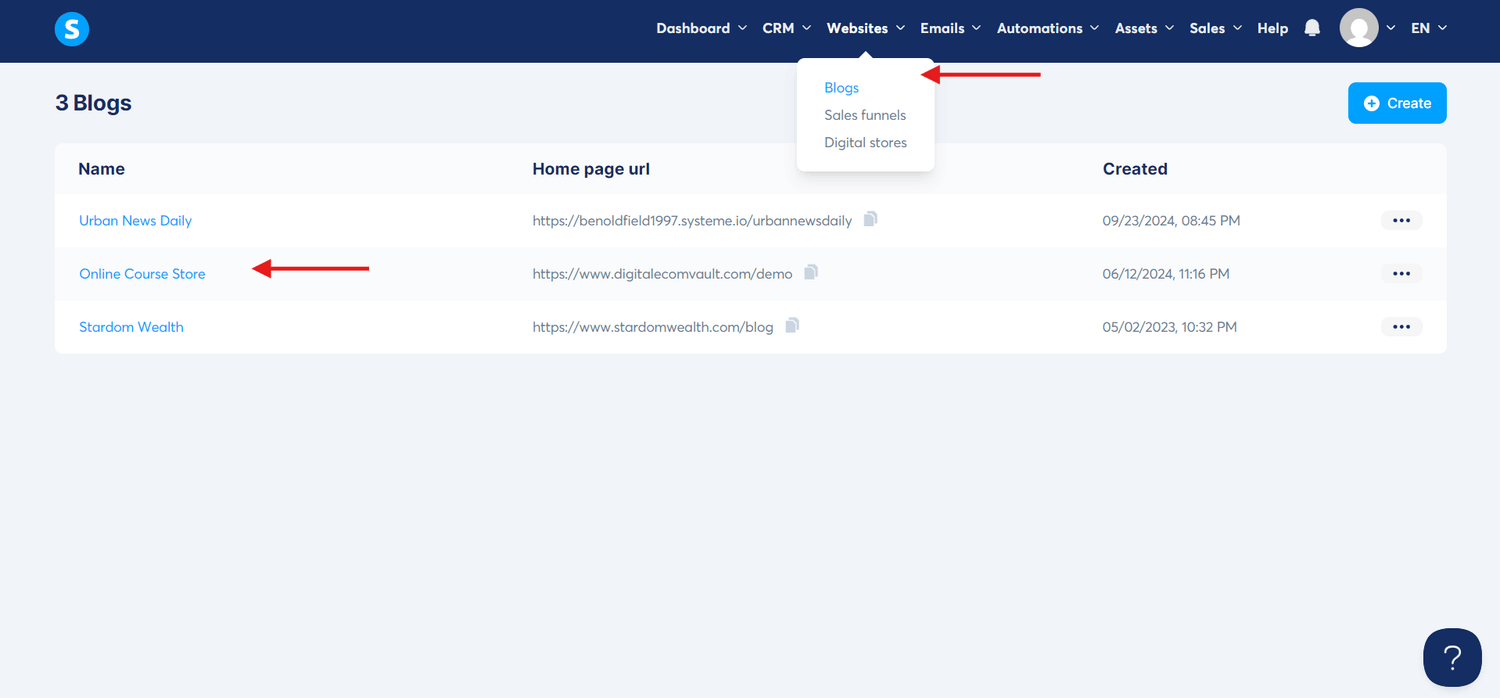
Your storefront will appear under the “Blogs” section and your 3 Sales Funnels will appear under the “Funnels” Section.


Make sure you have your payment gateway set up so you can receive payments - here is a link on how to set it up: https://help.systeme.io/category/538-payments
If you want to add your own custom domain then please follow these instructions here:https://help.systeme.io/article/135-add-custom-domain-into-systeme-io
Download any course from the library and store it on your own Google drive either as a standalone product or as a course bundle.
Copy the Google Drive share link and limit access by clicking the 3 dots next to the folder -> Share -> General Access -> Restricted.

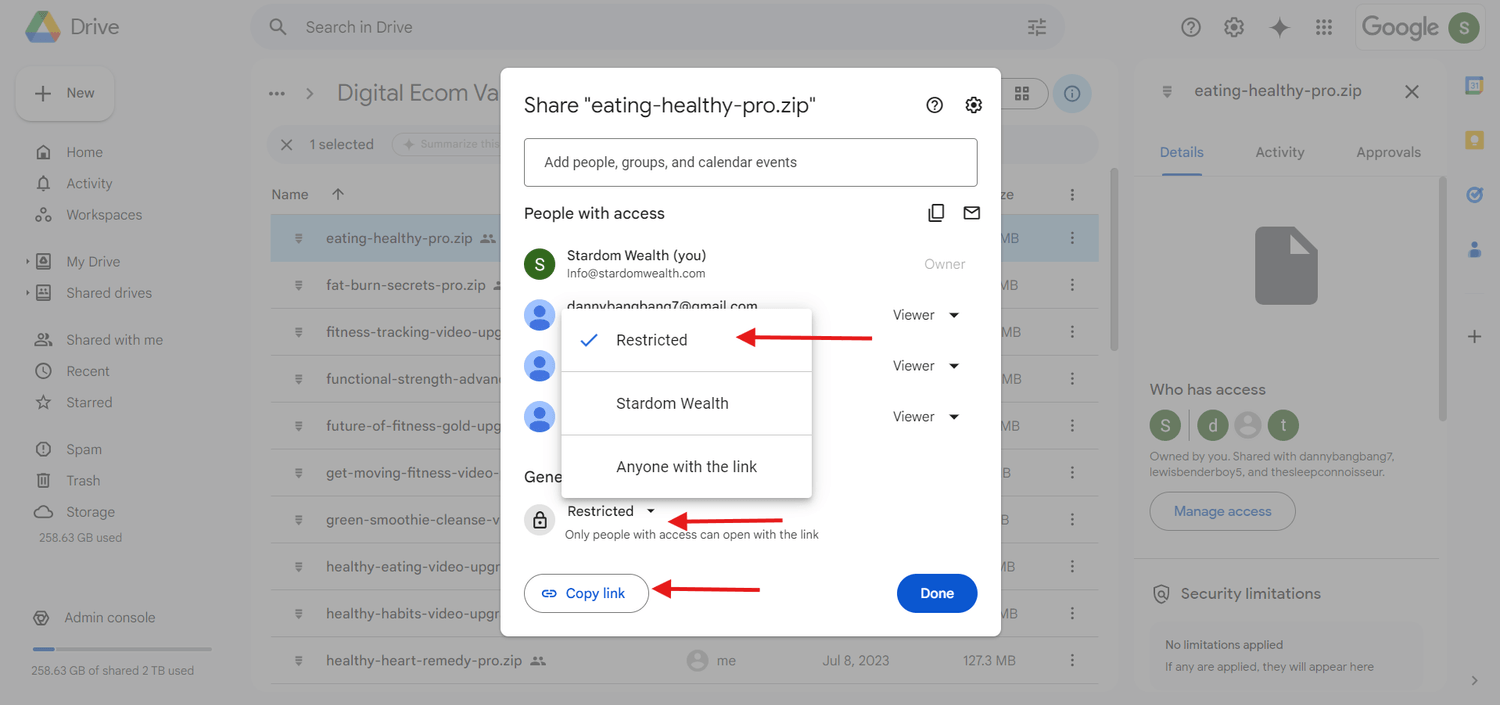
This will make sure that the user has to request access to the drive and you just check and approve via your Google Drive (If you would rather the buyer not have to request access, choose “Anyone with the link” instead)
Edit each funnel template (product page) to suit your selected digital products by clicking on the funnel in the funnels section of systeme and then editing the "Payment Pages" (Order forms) in each funnel. Here is where you can edit the details of your chosen product including the name, description, image, price etc. To configure price plans for each product, please follow the instructions here: https://help.systeme.io/article/153-how-to-create-and-configure-a-price-plan


Edit the "Thank You" page of each sales funnel and paste your Google Drive link here - this link will be the link to the course you are selling. So once the buyer has paid they will be presented with the Google Drive link to access your course after purchasing.


You can also set up automation to send the customer an email with the link once they have purchased. Here are instructions for setting up automation: https://help.systeme.io/article/294-how-to-send-an-automatic-email-containing-a-file-after-the-sale
Save the funnel and go to the blog page (your store front).
Edit the storefront blocks to suit your chosen courses by going to the blog section of systeme, then click on your storefront, then pages and edit the "home page" and "products page".

Here you can add prices, images & titles for each course or bundle - it's entirely up to you how you customize this. Then add / edit the buy now buttons and link these to your funnels that you saved earlier. (To get the funnel links, go to your funnel payment page in funnels section and it will be the full URL you see under URL path)


Important Info: We have provided all other pages (All Courses, About, Contact, Home, Terms & Conditions and All Policy Pages) within the blog section under the pages tab. In the "Blog Layout" editor you must go and relink all of these links in the header & footer to the links provided under the pages tab. See screenshote below:


Your website visitors will now be able to view your courses for sale on the storefront. When they click "Buy Now" they will land on your funnel pages (product pages) which consists of info about the courses you are selling and the payment form.
The user can buy chosen material from from this page, by filling in their payment and contact details and clicking on the "Get Access Now" button. Once the user submits the form, they will be redirected to the thank you page containing the google drive link of that product where they can download the files.
To add more than 3 courses, you will need to upgrade to a paid systeme.io plan as the free plan only allows 1 blog (Storefront) and 3 sales funnels (Course Sales Pages).
If you do not want to upgrade you can always sell the courses as bundles within the 3 funnels provided
ABOUT
We provide PLR Digital Products that you can learn and resell yourself for 100% profit + Pre-Built Fully Customizable Systeme.io E-Commerce Websites.
QUICK LINKS
SUBSCRIBE
© Digital Ecom Vault 2025, all rights reserved.

